CSSで見出しに連番を付ける-Luxeritasに適用

Luxeritasのカスタマイズにはまっているhatenaです。今回は見出し(h要素)をカスタマイズでどうせなら連番を付けようといろいろ調べました。
シンプルなHTMLで見出しに連番を付加する方法を紹介し、さらに当ブログのLuxeritasに実装したものも紹介します。
シンプルなHTMLへの実装例
CSSカウンターを使います。詳細は下記のページに解説してあります。

WordPressの投稿記事ページにありがちなシンプルなHTMLでh2要素のみに実装した例
See the Pen CSSで見出しに連番1 by hatenachips (@hatena19) on CodePen.
<div class="post">
    <h2>見出し</h2>
    <h2>見出し</h2>
    <h2>見出し</h2>
</div>
.post {
counter-reset: h2; /* 'h2'という名前のカウンターを設定し、 0 で初期化する。 */
}
h2::before {
counter-increment: h2; /* h2カウンターの値に1を加算 */
content: counter(h2) ". "; /* h2カウンターの値を表示 */
}全体のコンテナ postクラスでカウンターを設定して初期化します。カウンターの名前は何でもいいのですが、分かりやすくするために要素名と同じ h2 にしました。
h2要素のbefore疑似要素でカウンター値に加算して、それを表示させます。お好みのテキストを付加することも可能です。例では、". " を付加しましたが、content: "第" counter(h2, cjk-ideographic ) "章";とすれば「第一章」と表示されます。
h2からh4までに階層構造の連番を付加
下のような連番を付加します。
See the Pen CSSで見出しに連番2 by hatenachips (@hatena19) on CodePen.
<div class="post">
    <h2>見出し</h2>
        <h3>見出し</h3>
            <h4>見出し</h4>
            <h4>見出し</h4>
        <h3>見出し</h3>
            <h4>見出し</h4>
            <h4>見出し</h4>
        <h3>見出し</h3>
            <h4>見出し</h4>
            <h4>見出し</h4>
    <h2>見出し</h2>
</div>
.post {
counter-reset: h2;
}
.post h2 {
counter-increment: h2;
counter-reset: h3;
}
.post h3 {
counter-increment: h3;
counter-reset: h4;
margin-left: 15px;
}
.post h4 {
counter-increment: h4;
margin-left: 30px;
}
.post h2:before {
content: counter(h2) ". ";
}
.post h3:before {
content: counter(h2) "." counter(h3) ". ";
}
.post h4:before {
content: counter(h2) "." counter(h3) "." counter(h4) ". ";
}h2要素のセレクターでh3カウンターを初期化、h3要素セレクターでh3カウンターに加算、h3before疑似要素のセレクターで h2カウンター値とh3カウンター値を連結してます。h4要素に関しても同様に設定します。
また、マージンで字下げしてます。
連番をCSSでデザイン
連番を丸の中に白抜きで表示させました。HTMLは一番最初のものです。
See the Pen 見出しに丸囲み連番を付加 by hatenachips (@hatena19) on CodePen.
.post {
    counter-reset: h2;
}
.post h2{
    display: flex;
    line-height: 4rem;
    font-size: 1.8rem;
}
.post h2:before {
    counter-increment: h2;
    content: counter(h2);
    background-color: #333;
    color: #fff;
    text-align: center;
    width: 4rem;
    height: 4rem;
    line-height: 4rem;
    font-size: 1.8rem;
    margin-right: 1.2rem;
    border-radius: 50%;
    flex-shrink: 0;
}h2セレクターのdisplay: flex;で連番と見出しを横並びにします。h2:beforeセレクターの flex-shrink: 0;これがないと見出しが長くて折り返したときに連番部分の幅が縮んでしまいます。
h2:beforeセレクターの文字色、背景色、サイズ等を設定して border-radius: 50%;で背景を丸くします。
当ブログ(Luxeritasテーマ)に実装したCSS
仕様
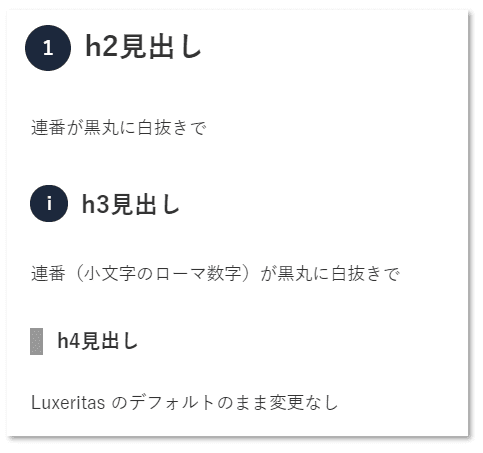
- h2見出しに付加する連番は、黒丸背景に白抜き数字(上記のサンプルと同じ)
ネガティブマージンで少し左に移動 - h3見出しに付加する連番は、黒丸背景に白抜きの小文字のローマ数字
ネガティブマージンで少し左に移動、h3要素よりは移動は少なくして字下げ - h4見出しはLuxeritasテーマのデフォルトのまま
下の画像のようになります。
CSS
追加するCSSは下記になります。
/* 見出し */
.post {
	counter-reset: h2;
}

.post h2{
	display: flex;
	border-left: 0;
	line-height: 4.2rem;
	counter-increment: h2;
	counter-reset: h3;
}
.post h2:before {
  content: counter(h2);
	background-color: #19283c;
	border-radius: 50%;
	color: #fff;
	text-align: center;
	width: 4.2rem;
	height: 4.2rem;
	line-height: 4.2rem;
	font-size: 1.8rem;
	margin-right: 1.2rem;
	margin-left: -25px;
	flex-shrink: 0;
}

.post h3 {
	display: flex;
	line-height: 3.6rem;
	border-left: 0;
  counter-increment: h3;
}
.post h3:before {
	content: counter(h3,lower-roman);
	background-color: #19283c;
	border-radius: 50%;
	color: #fff;
	text-align: center;
	width: 3.4rem;
	height: 3.4rem;
	line-height: 3.6rem;
	font-size: 1.6rem;
	margin-right: 1.2rem;
	margin-left: -20px;
	flex-shrink: 0;
}
まとめ
見出しの先頭に連番を付加するCSS、 連番部分をCSSでデザインするサンプルを紹介しました。当ブログに実装したCSSも紹介しました。
ご自身のサイトの見出しのカスタマイズをするときにご参考になれば幸いです。